A creative journal of experiments, discoveries, and everyday inspiration.
I'm Glaiza ❤️
Hi, I'm Glaiza! I'm a Filipino artist, graphic designer, and lifelong creative based in Laguna, Philippines. I love watercolor painting, digital art, photography, and exploring new creative ideas. This is where I share little pieces of my creative journey, experiments, and everyday inspirations.Read More
Have you ever wanted to try your hand at animation? A few years ago, I created an animation tutorial for YouTube to share what I learned and walk through the process of creating an animation.
I'm bringing that tutorial to my creative journal so it's easier to find and revisit. Whether you're exploring animation for the first time or looking for inspiration for your next creative project, I hope you'll find something useful in this video.
Here's my animation tutorial! Watch the video below and follow along as I demonstrate the process.
Take your time exploring the process, and don't be afraid to experiment along the way. Learning a new creative skill takes practice, and sometimes the best way to learn is simply to give it a try.
Animation is another way to bring creative ideas to life. Just like illustration and graphic design, it offers opportunities to experiment, learn new techniques, and discover different ways to express an idea.
I enjoy exploring different creative mediums, and sharing what I learn is part of that journey. This tutorial is one little piece of my ongoing creative exploration.
If you decide to try it yourself, I'd love to hear how it goes! Leave a comment below or share your work with me.
In December 2020, we received a very precious gift from God. After a decade of being married, we're finally blessed and expecting a child.
We went to my OB-GYN doctor to confirm, and yes we're having a baby!
But we needed to be extra careful as there's just so many factors and threats to my pregnancy - age, subchorionic hemorrhage, risk of gestational diabetes and hypertension, and of course the covid-19 pandemic.
I was in bedrest and had to take lots of medicines for my subchorionic hemorrhage during most of my first trimester bu fortunately, I didn't have morning sickness. I wore PPE (face mask, face shield, and gown) during my clinic appointments. I religiously monitored my blood sugar levels starting second trimester and my blood pressure during my third trimester. Despite all the hardships, we knew in our hearts that it's all gonna be worth it.
Part of being cautious, we only go out of the house for hospital visits. So, everything we needed we buy online to be delivered. We are also thankful for family members who tirelessly prepared and brought food for us.
As my due date drew near, we started buying baby stuff. We were overwhelmed with so many options online (as well as the amount of stuff we needed to buy), so we took our time to pick the best ones that are both high quality and fits our budget. Unboxing baby stuff made us even more excited to meet our baby. Oh, have I not mentioned yet? We're having a baby GIRL!
Part of the hospital protocols these days is to present a negative RT-PCR test result to be admitted and the validity of the test is 7 days only. I had to take the swab test 2x. And it's totally fine that baby girl took her precious time baking inside mommy's tummy and be full-term ;)
On the dawn of July 21, 2021, 1 week before the expected due date, I had the so-called "bloody show" and was already feeling minor contractions. So we informed my doctor, took a quick bath, gathered our hospital bags (which we packed on my 35th week), and went straight to the hospital as instructed. Ed did a rapid test for Covid-19 (negative). After being checked and done with the paper works, I was then admitted the same day at around 8am. I was brought to the delivery room at 2pm. The contractions intensify by the hour. I remember there was even a time when I'd almost jump out of the bed due to labor pain. Then, at 7:25pm, I gave birth to our baby via normal spontaneous delivery with epidural.
To our precious baby, Eliana Graciela, welcome to our lives. Now, our family is complete. We'll do our best to be great parents to you. We love you very much!
I have a female Persian cat named Kerri and she has been a source of joy since 2014. I decided to make a comic illustration series dedicated to her, which I will name "The Life of Kerri-chan".
This is my first original comic scene called "I fit!". This shows how our Persian cat, Kerri, would be more interested in a box instead of her canned foods.
I also made this illustration called "Cat Needs Attention" showing Kerri being too needy. I was finishing some work that's already due and she kept scratching my leg as if begging for something. I gave her food but she decided to keep coming back and annoy me as she needed (or maybe 'wanted') all the attention at a very busy moment.
Then, I also did this illustration called "Peek-a-boo!" Because sometimes, Kerri pops up out of nowhere and likes to surprise me with her big round eyes and cute little nose. Sometimes she'd pop up from the edge of my bed, from my working table, and other random places. She's sweet, clingy, playful and silly.
This last illustration is called "Can't wait for the weekend". Kerri is our only pet and I feel like it's one of the reasons why she gets bored oftentimes and gives me this mid-week mood! In a day, she's 70% sleeping, 10% eating, 10% playing and 10% asking for my attention! I wish we can adopt one kitty to boost her social interaction.
That's it for now. I'm looking forward to draw more comic illustrations of Kerri and other subjects or topics as well.
Want to give your typography a soft, artistic watercolor look? In this tutorial, I'll show you how to create a watercolor typography effect in Adobe Photoshop.
This is a fun way to experiment with textures and fonts, combining the look of watercolor with digital design. You can use the technique to create lettering for art projects, creative graphics, and other designs.
Watch the Tutorial
Follow along with the video below as I walk you through the process of creating the watercolor typography effect in Photoshop.
Download the Resources
To follow along with the tutorial, you can download the resources I used here:
Make sure to check the font license terms before using either font in commercial projects.
Give It a Try!
Feel free to experiment with different words, fonts, and watercolor textures to make the effect your own. If you try this tutorial, I'd love to see what you create! Share your project photos on Instagram and tag @glai.creativelife, or use #gclinspired. Happy creating!
As a lover of Japanese food, especially sashimi, I created this watercolor clipart set featuring ten kinds of sushi. Each illustration was painted in watercolor and digitized for use in creative projects.
The Japanese Sushi Watercolor Clipart Set #1 includes the following file formats:
PNG — individual elements with transparent backgrounds
JPEG — for digital projects and designs
Illustrator EPS — for vector-based design workflows
Whether you're creating invitations, menus, food-themed graphics, or other personal and creative projects, these sushi illustrations can add a hand-painted touch to your designs.
Planning a beach getaway? Before you pack your bags and head for the sun, sand, and sea, here are 15 beach essentials you won't want to leave behind!
I created the illustrations for this list while experimenting with my iPad Pro. I was exploring digital drawing and trying out different ways to create my own graphics. I thought it would be fun to turn a practical beach packing checklist into a collection of illustrated essentials.
From a sun hat and sunscreen to your favorite beach tote, each item was drawn as part of this little creative project.
15 Beach Essentials to Pack
1. Sun Hat — Keep your head shaded and help protect your face from the sun.
2. Flip-Flops — Perfect for casual strolls along the beach.
3. Sunscreen — Help protect your skin from UVA and UVB rays.
4. Swimwear — Pack something comfortable for swimming and enjoying the water.
5. Camera — Capture fun moments and memories from your getaway.
6. Towel — A must-have for drying off after a swim or lounging on the sand.
7. Reusable Water Bottle — Stay hydrated while reducing single-use plastic waste.
8. Sunglasses — Protect your eyes from the sun with a pair that offers UV protection.
9. Tote Bag — Carry your beach essentials in one handy bag.
10. Waterproof Phone Pouch — Help protect your phone from splashes and sand.
11. Hair Comb — Keep your hair tangle-free after a swim.
12. Lip Balm — Keep your lips moisturized with an SPF lip balm.
13. Tank Top — An easy cover-up to wear before or after swimming.
14. Scarf — A versatile accessory that can double as a light cover-up or an extra layer.
15. Sleep Mask — A handy companion for getting some rest after a fun-filled day.
Ready for the Beach?
There you have it—15 beach essentials to add to your packing checklist! I also enjoyed turning this simple list into an illustration project while learning to draw digitally on my iPad Pro.
Do you have a beach essential that you always bring along? Let me know in the comments!
There are many different brands and kinds of watercolor art supplies in the market, and these are what I have acquired over the years: Prang, Pentel, Faber-Castell, etc. These are inexpensive products, more like beginner sets, but they are totally workable! Plus, they are available in most bookstores here in the Philippines.
But recently, I invested in artist-grade supplies, like Holbein watercolor tubes from Pens Galore Philippines and Escoda brushes from ArtWhale.PH. These cannot be found in the shops near my location, so I'm glad I found these online shops.
Escoda Versatil Synthetic Kolinsky Fan Shaped Brush - Long Handle - Size 4
I also use inexpensive watercolor papers for now. I bought both Canson and Fabriano watercolor papers at National Bookstore. But I'm eager to try other brands like Saunders Waterford and Bockingford. I'm considering buying from ArtWhale.PH since they have sets like this paper kit.
Lastly, here are the tools I'm using: a fabric brush holder, brush suspender for air-drying, brush washer, and ceramic mixing palettes. I bought all of these online from Lazada.
Do you have recommendations for products I should try? Please let me know in the comments, and I'll try to source them. Thank you!
Recently, I re-gained my interest in arts, particularly in
watercolor painting and doodling. I also got interested in hand lettering and
calligraphy. When I got out of the hospital this month, all I think about,
aside from recovery, is where have I put my watercolor pencils. I have the
12-pc. set by Faber-Castell before but for some reason we can’t find it and
it’s frustrating. 3 weeks past, I think I have recovered 70% and finally got
the chance to go to the mall to buy my new art supplies.
I was eyeing for Faber-Castell watercolor pencils and Prang
watercolor palette, which are both available at National Bookstore. I wanted
something easy to start with that I can bring anywhere I go with the littlest
mess possible. So I chose the 48-pc. Faber-Castell watercolor pencils, which go
perfect with my water brush pens, for PhP679.75. I’ll try the Prang set in the
future.
This is how it looks like. It comes with free paintbrush and
sharpener. You can pull the hang tab in front to slide out the drawer. Here are
the descriptions at the back of the packaging:
·Pencil
turns to Paint – with the touch of a wet brush, rich water soluble pencil
colors dissolve into brilliant water colors.
·Colors
blend beautifully with brush and water to create unlimited shades. For best
results, use watercolor or heavy grade papers.
·Thick
3.3mm leads are specially SV bonded to help prevent breakage.
·Clean and
easy sharpening guaranteed with quality Faber-Castell sharpener included.
Caution: Please avoid dipping watercolor pencils in water. For best
performance, store pencils in a cool and dry area.
These are the 48 color shades:
401 White
404 Zinc Yellow
407 Lemon
409 Orange Yellow
414 Dark Orange
416 Cinabar Light
418 Scarlet Light
421 Light Geranium Red
426 Dark Carmine
427 Light Carmine
429 Pink Madder Lake
425 Dark Magenta
419 Light Magenta
434 Orchid
430 Light Flesh
432 Dark Flesh
433 Wine Red
435 Red Violet
439 Light Violet
437 Blue Violet
444 Light Cobalt Blue
443 Deep Cobalt Blue
447 Light Blue
445 Light Phthalo Blue
451 Prussian Blue
449 Oriental Blue
453 Peacock Blue
454 Aquamarine
457 Prussian Green
461 Viridian
462 Tree Green
463 Emerald Green
466 Grass Green
459 Hookers Green
470 Apple Green
472 Grey Green
473 Olive Green
476 Van Dyck Brown
480 Raw Amber
483 Gold Ochre
478 Nougat
487 Burnt Ochre
492 Indian Red
495 Cool Light Grey
496 Cool Silver Grey
499 Black
448 Silver
452 Gold
Each pencil measures almost 7 inches long.
Since this is new, I decided to make swatches or color chart so I have an
actual reference of the colors. I personally suggest this process especially if
you are using a new palette / set / media.
In this photo, I drew/shaded just like how you draw/shade
using a regular pencil.
In this photo, I apply water using a wet paintbrush. I used
a water brush pen here, but of course a regular paintbrush will do.
And voila, my own color chart. Isn’t it beautiful?
I hope you find this post and photos helpful. Thank you for
reading. ‘Til next time!
I'm finally ready to introduce my new babies! 😁 But first, let me tell you how I got them. Last Tuesday, I placed an order through DP Online. I waited until the afternoon for a confirmation email, but nothing came. Being impatient, I decided to give them a call. It turned out they were having problems with their system and hadn't received my order, so I placed it again through email instead. I paid yesterday, and guess what? My new gear arrived today! Yey! I love rewarding myself. ❤️
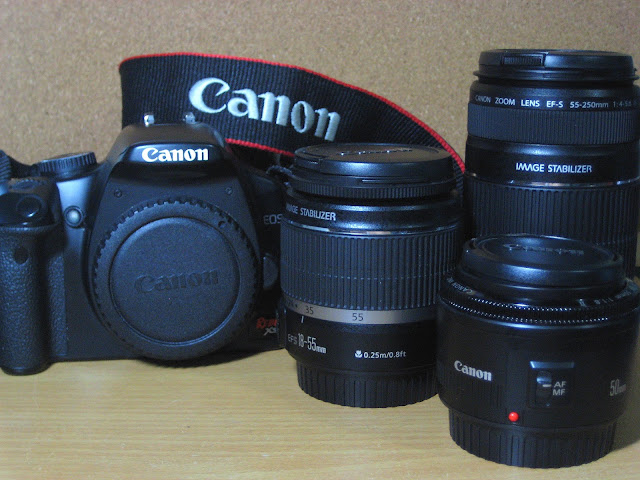
Here's a photo of my growing Canon family: my Canon XSi, the 18–55mm kit lens, and my two new lenses—the 50mm and 55–250mm.
P.S. I also got a remote control, a lens hood for the 18–55mm, and another for the 55–250mm.
P.P.S. I just learned how to fold a reflector, thanks to YouTube!
P.P.P.S. I'm planning to join a photography competition by Diversity for Life. I just hope I can come up with a good composition. Wish me luck!
These are some of my shots using my Canon Rebel XSi! I'm still learning, but I'm really enjoying the process. Last Monday, August 31, I went to the University of the Philippines Los Baños (UPLB) with someone to take pictures of interesting subjects. I was actually hoping to photograph flowers or butterflies, but I wasn't able to find the shots I had in mind. Instead, I ended up capturing a few other things along the way.
After a long walk, here's a picture of my worn-out shoes. They're telling me they want to retire, but I told them, "No, not yet! Let me take you to the medic team first!" Hahaha! Did you notice the ripped part? I really need to sew that up soon.
And here's a photo of two lovers who, at the end of the day, will have to part ways... or perhaps two lovers who tried to work things out but eventually decided to move on without each other.
Hahaha! So much drama! :D
I'm still learning how to use my camera and find interesting subjects to photograph, but that's part of the fun. Here's to more photo walks and little discoveries along the way!